Editor Layout
Understand the four main panels of the Toast editor and how they work together.
Overview
The Toast editor is organized into four main areas, each designed for a specific part of the editing workflow.

The Four Panels
1. Transcript Panel (Left)
The transcript panel displays your video's full transcript with word-level timestamps. This is where you do most of your editing — by reading and modifying text rather than scrubbing through video.
Key features:
- Timestamps on the left show when each segment starts
- Click any word to jump the video preview to that moment
- Strikethrough text indicates removed segments
- Orange-highlighted words are detected filler words (e.g., "um", "uh")
- Filler tags show confidence levels (e.g., "introductory filler — 90% confident")
- Undo/Redo buttons at the top with full 50-operation history
- Segment counter shows how many segments are kept vs. total (e.g., "11/14 kept")
2. Video Preview (Center)
The center panel shows a real-time preview of your edited video with all effects, B-roll, and captions applied.
Key features:
- Live preview with captions rendered in real-time
- CC button to toggle caption visibility
- Fullscreen button to expand the preview
- Status bar below the preview showing: segments kept, segments cut, current time/total duration, chat count, B-roll count, and effects count
3. Properties & Sidebar Panel (Right)
The right side of the editor has two layers: the Properties panel and the icon sidebar.
Properties Panel
The Properties panel shows settings for whatever is currently selected — a video segment, B-roll clip, or effect. When nothing is selected, it displays a prompt: "Select a segment, B-roll, or effect to view properties." See the Properties Panel guide for details on editing B-roll and effect properties.
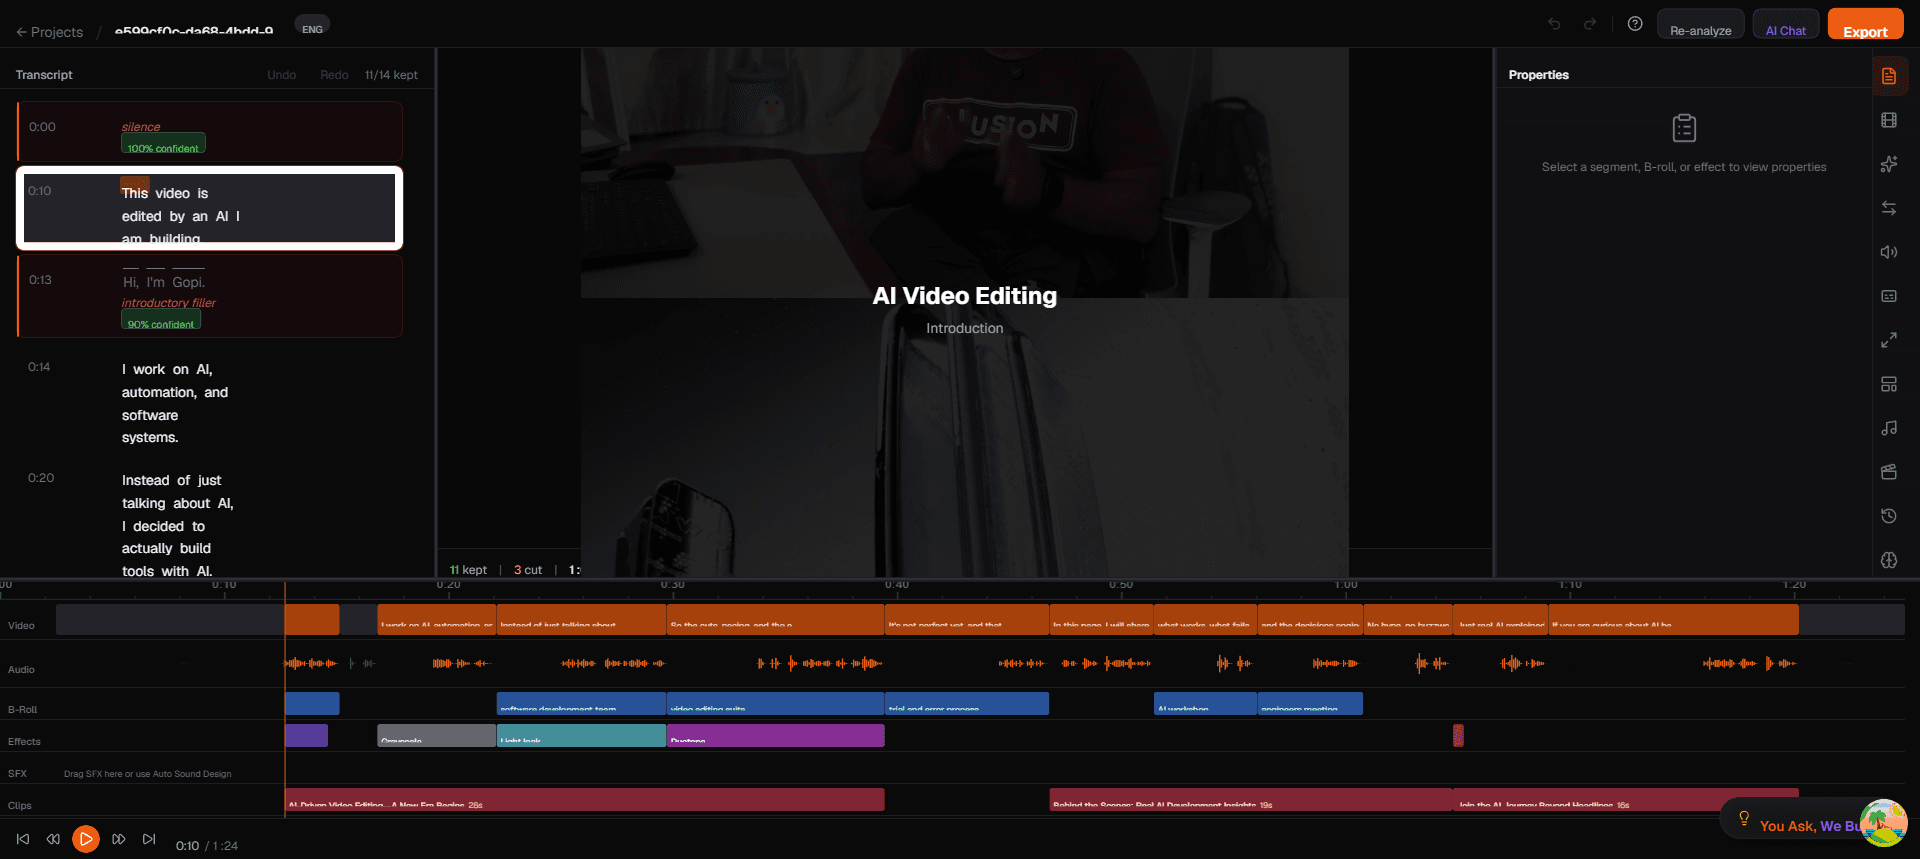
Icon Sidebar
The narrow icon strip on the far right provides quick access to every tool panel. Click an icon to open its panel. The available icons from top to bottom are:
| Icon | Panel | Description |
|---|---|---|
| Grid | Templates | Apply video layout templates (16:9, 9:16) |
| Sparkle | Effects | Add per-segment creative effects (Grayscale, Duotone, etc.) |
| Sliders | Video Effects | Global color presets and brightness/contrast/saturation |
| Arrow | Transitions | Add transitions at specific cut points |
| Volume | Volume | Adjust audio levels |
| Layers | Engagement Overlays | Add subscribe buttons, like reminders, etc. |
| Crop | Reframe | Change aspect ratio (16:9, 9:16, 1:1, 4:5) |
| Film | B-Roll | Browse and place stock footage overlays |
| Music | Sound FX | Auto sound design and SFX library |
| Scissors | Viral Clips | View AI-generated short-form clips |
| Clock | Slow Motion | Apply slow-motion to selected segments |
| CC | Captions | Toggle captions and choose styles |
| Brain | AI Reasoning | See why the AI made each edit decision |
| History | History | View and restore from edit history |
| Keyboard | Shortcuts | View keyboard shortcut reference |
4. Timeline (Bottom)
The multi-track timeline gives you a visual overview of your entire edit.
Tracks (top to bottom):
| Track | Color | Purpose |
|---|---|---|
| Video | Orange waveform | Main video segments — kept segments are shown, gaps are cuts |
| Audio | Orange waveform | Audio waveform visualization |
| B-Roll | Blue/teal | Stock footage overlays positioned at specific timestamps |
| Effects | Purple/green/pink | Visual effects (Grayscale, Light Leak, Duotone, etc.) with color-coded labels |
| SFX | Yellow | Sound effects and auto sound design |
| Clips | Orange | AI-generated viral clips with titles and durations |
Timeline controls (bottom-left):
- Skip to start / Skip to end
- Rewind / Fast-forward
- Play/Pause (orange play button)
- Current time / Total duration display
Top Toolbar
The toolbar across the top of the editor provides:
| Element | Purpose |
|---|---|
| Projects link | Navigate back to the project list |
| Project name | Current project identifier |
| ENG badge | Detected language |
| Undo/Redo arrows | Global undo and redo |
| Re-analyze | Re-run AI analysis on the video |
| AI Chat | Open the conversational AI editing panel |
| Export | Navigate to the export settings page |
Next Steps
- Transcript Editor — Learn to edit by editing text
- AI Chat — Give natural language editing commands
- Export — Configure and export your final video